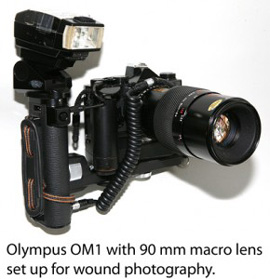
 Many people have asked how I took the high quality photos of wounds in my recently published Pocket Guide to Pressure Ulcers. I’ve been photographing pressure ulcers and other skin conditions in elderly persons since my geriatric fellowship in 1985. The photos in this book were chosen from hundreds in my wound library, reviewed by Elizabeth Ayello and myself, and picked for the most typical example of each pressure sore stage and wound type.
Most of the photos were taken with Kodachrome 64 ASA slide film which had legendary sharpness, vivid colors, and natural skin tones, but required very tight exposure control. The detail obtained on one Kodachrome 35 mm slide was equivalent to 20 megapixels! This film is no longer manufactured.
The camera was a completely manual Olympus OM1 equipped with a Spiratone 90 mm 1:1 macro lens and an Olympus flash unit pumped with six C batteries and calibrated for maximum flash power with the lens at narrowest f-stop, usually f/11 or f/16. Spiratone was a store near Herald Square in Manhattan that had every camera gadget under the sun, and carried many high quality Japanese-made lenses. The film was automatically advanced with an Olympus winder that took four AA batteries. The equipment was heavy and cumbersome but took flawless photographs once the shot was set up and the exposure bracketed.
Most photos were taken on wound rounds which technically was not simple. Pressure ulcers occur in areas that are frequently soiled or covered with dressings, on patients who have limited mobility or are in pain. Each photo therefore required cooperation of the patient as well as some lifting and turning by the staff members and nursing assistants who assisted me on rounds.
Some slides had been in storage for over twenty years and occasionally I considered trashing them. Others were used for lectures and publications but the archive was never fully explored until I teamed up with Elizabeth to write this book. Some boxes of slides had never been opened since I got them back from Kodak after being developed.
First, using a light source made from an old x-ray view box, I sorted the slides, picked the best images and digitized them with a Nikon Coolscan 4000 dpi scanner. Each photo was digitally dedusted, color corrected, and cropped in Photoshop, and patient identification information removed. Each photo was copyrighted and registered with the help of an attorney who specialized in this work. Elizabeth and I reviewed every photo and chose the best for each wound category and stage.
Putting together this Guide to Pressure Ulcers clearly involved more than the efforts of the authors and production staff at the New Jersey Hospital Association (NJHA). This Guide was put together with the help of hundreds of patients who I have cared for over the years and the dedicated interdisciplinary staff who assisted me.
* * * * * * * * * * * * * * *
To access all blog posts on the Pocket Guide to Pressure ulcers click here.
To purchase the Guide to Pressure Ulcers click here.
